Navigation menu

A portable, open-source, coherent noise-generating library for C++
Tutorial 1: Including the libnoise library
In this tutorial, you'll learn how to include the libnoise library into your own development projects.
Table of contents
Using libnoise with Microsoft Visual C++
Note: This section of the tutorial assumes that you're developing with Microsoft Visual C++ 5 included with Microsoft Visual Studio 97, although it should not be difficult to adapt these instructions for use with other versions of Visual C++.
Before running this tutorial, make sure you've done the following tasks:
- You've created an empty directory that will contain the libnoise headers and binaries. This tutorial assumes this directory is called c:\libnoise, although you can rename it if you want.
- You've unzipped the libnoise headers (83 KB) into the libnoise directory. This will create an include\noise subdirectory within that directory.
- You've unzipped the libnoise binaries (67 KB) into the libnoise directory. This will create a bin subdirectory within that directory.
- You've added the bin subdirectory to the system path. If you do not know how to modify the system path, or you have insufficient privileges to do so, copy the libnoise.dll file from the bin subdirectory into your project directory.
Configuring Microsoft Developer Studio
To configure Microsoft Developer Studio so that it is aware of the libnoise directories, perform the following steps:
-
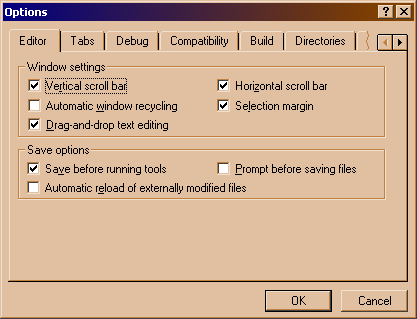
Run Microsoft Developer Studio, then open the Tools | Options menu. The Options dialog box appears:
-
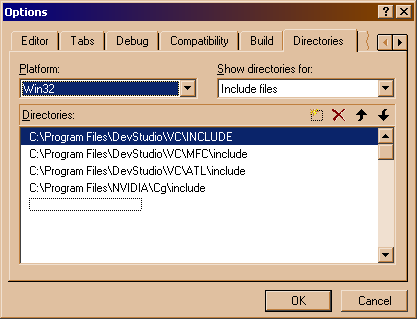
Click on the Directories tab:
-
Under the Show directories for: drop-down box, select Include files. You should notice a dotted box at the bottom of the Directories list. Double-click on it and enter c:\libnoise\include, but replace c:\libnoise with the correct path to the libnoise library.
-
Under the Show directories for: drop-down box, select Library files. You should notice a dotted box at the bottom of the Directories list. Double-click on it and enter c:\libnoise\bin, but replace c:\libnoise with the correct path to the libnoise library.
-
Click on the OK button. Microsoft Developer Studio should now be properly configured.
Creating a project file
Each time you want to create a project file that uses libnoise, perform the following steps:
-
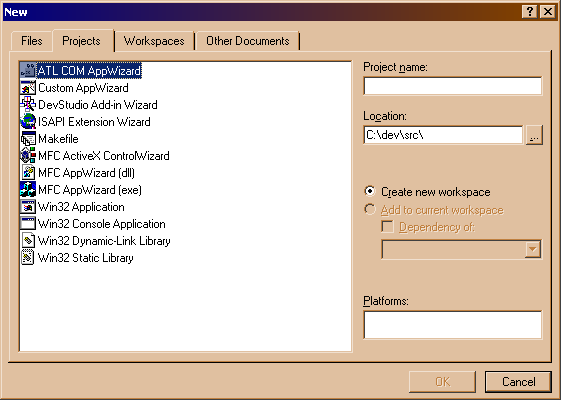
Run Microsoft Developer Studio, then open the File | New... menu. The New dialog box appears:
-
Make sure the Projects tab is selected.
-
In the Project name: text box, enter a name for this project.
-
Set the project type to "Console Application" by selecting Win32 Console Application. This will allow you to concentrate on writing code for these tutorials without having to write the (long, ugly) code for a Windows-based GUI.
-
Click on the OK button. An empty project file should now be created.
Note for Visual Studio 6 users: Another dialog box appears that prompts the user for the files to create for this project. Select Create an empty project and then click on the OK button.
-
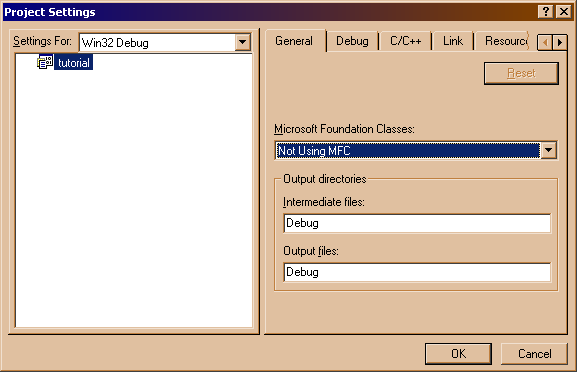
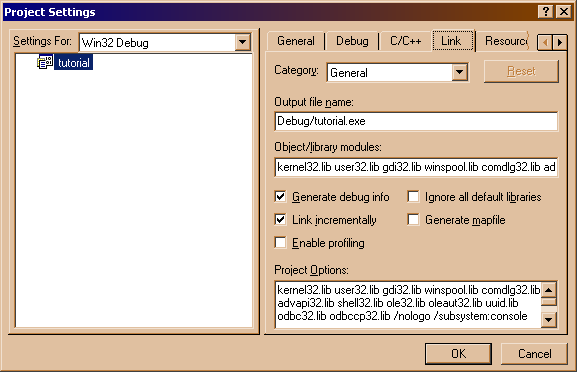
Next, you'll need to add the libnoise binaries to your project file. Open the Projects | Settings menu. The Project Settings dialog box appears:
-
Click on the Link tab:
-
In the Settings For: drop-down box (top-left corner), select Win32 Debug.
-
In the Category: drop-down box (first control in the right pane), select General.
-
Scroll to the very end of the Object/library modules: text box. Enter a space character, then enter libnoise.lib. Make sure you did not accidentally delete all the other modules in that text box.
-
In the Settings For: drop-down box (top-left corner), select Win32 Release.
-
Scroll to the very end of the Object/library modules: text box. Enter a space character, then enter libnoise.lib. Make sure you did not accidentally delete all the other modules in that text box.
-
In the Settings For: drop-down box (top-left corner), select Win32 Debug again. If you do not do this, you cannot use the debugger in this project.
-
Click on the OK button. Your project file should now be properly configured. You should also save your project file at this point.
Note: If the path to the libnoise.dll file is not in the system path, copy the libnoise.dll file from the bin subdirectory into your project directory.
You're now ready to start the second part of the tutorial.
Using libnoise with gcc on UNIX platforms
Before running this tutorial, make sure you've done the following tasks:
- You've downloaded the libnoise headers (83 KB) into /usr/local/include/noise.
- You've built the binaries from the libnoise source (1,628 KB) and copied the resulting binaries into /usr/local/lib.
To compile a source file that uses libnoise, type the following on the command line:
g++ source_filename -o output_name -I/usr/local/include -L/usr/local/lib -lnoise
You're now ready to start the second part of the tutorial.
© 2003-2005 Jason Bevins
