Navigation menu

A portable, open-source, coherent noise-generating library for C++
Tutorial 7: Creating a Terragen terrain file
In this tutorial, you'll write a terrain height map to a Terragen terrain file (*.ter) and use Terragen to create a 3D rendering from it. You'll create this height map using the same group of noise modules you created in the previous tutorial.
Note: Because Terragen is an application that's currently only available for the Windows and MacOS operating systems, this tutorial won't be useful to you if you're running a flavor of UNIX. In this case, you should proceed to the next tutorial.
Note: You don't need any Terragen experience for this tutorial.
Table of contents
Obtaining Terragen
Terragen is an application that produces very realistic renderings of terrain height maps. It can apply procedural textures with near-infinite detail to the terrain. One of its most impressive features is its atmospheric lighting model, which is capable of generating sunbeams through clouds, among other things.
Terragen is also relatively inexpensive for a terrain rendering application, A reduced-functionality free (as in beer) version is also available. For this tutorial, you can use either the freeware version or the full version.
Before moving to the next step of this tutorial, install Terragen first. The current version as of this writing is 0.9.19. This tutorial assumes that you've downloaded and installed that version.
Creating a Terragen terrain file
In preparation for this tutorial, open the source file you created in the previous tutorial. The code in that file should look like this:
#include <noise/noise.h>
#include "noiseutils.h"

using namespace noise;

int main (int argc, char** argv)
{
  module::RidgedMulti mountainTerrain;

  module::Billow baseFlatTerrain;
  baseFlatTerrain.SetFrequency (2.0);

  module::ScaleBias flatTerrain;
  flatTerrain.SetSourceModule (0, baseFlatTerrain);
  flatTerrain.SetScale (0.125);
  flatTerrain.SetBias (-0.75);

  module::Perlin terrainType;
  terrainType.SetFrequency (0.5);
  terrainType.SetPersistence (0.25);

  module::Select terrainSelector;
  terrainSelector.SetSourceModule (0, flatTerrain);
  terrainSelector.SetSourceModule (1, mountainTerrain);
  terrainSelector.SetControlModule (terrainType);
  terrainSelector.SetBounds (0.0, 1000.0);
  terrainSelector.SetEdgeFalloff (0.125);

  module::Turbulence finalTerrain;
  finalTerrain.SetSourceModule (0, terrainSelector);
  finalTerrain.SetFrequency (4.0);
  finalTerrain.SetPower (0.125);

  utils::NoiseMap heightMap;
  utils::NoiseMapBuilderPlane heightMapBuilder;
  heightMapBuilder.SetSourceModule (finalTerrain);
  heightMapBuilder.SetDestNoiseMap (heightMap);
  heightMapBuilder.SetDestSize (256, 256);
  heightMapBuilder.SetBounds (6.0, 10.0, 1.0, 5.0);
  heightMapBuilder.Build ();

  utils::RendererImage renderer;
  utils::Image image;
  renderer.SetSourceNoiseMap (heightMap);
  renderer.SetDestImage (image);
  renderer.ClearGradient ();
  renderer.AddGradientPoint (-1.00, utils::Color ( 32, 160,   0, 255)); // grass
  renderer.AddGradientPoint (-0.25, utils::Color (224, 224,   0, 255)); // dirt
  renderer.AddGradientPoint ( 0.25, utils::Color (128, 128, 128, 255)); // rock
  renderer.AddGradientPoint ( 1.00, utils::Color (255, 255, 255, 255)); // snow
  renderer.EnableLight ();
  renderer.SetLightContrast (3.0);
  renderer.SetLightBrightness (2.0);
  renderer.Render ();

  utils::WriterBMP writer;
  writer.SetSourceImage (image);
  writer.SetDestFilename ("tutorial.bmp");
  writer.WriteDestFile ();

  return 0;
}
Since you're creating a Terragen terrain file instead of a Windows bitmap file, remove the following highlighted code:
  utils::RendererImage renderer;
  utils::Image image;
  renderer.SetSourceNoiseMap (heightMap);
  renderer.SetDestImage (image);
  renderer.ClearGradient ();
  renderer.AddGradientPoint (-1.00, utils::Color ( 32, 160,   0, 255)); // grass
  renderer.AddGradientPoint (-0.25, utils::Color (224, 224,   0, 255)); // dirt
  renderer.AddGradientPoint ( 0.25, utils::Color (128, 128, 128, 255)); // rock
  renderer.AddGradientPoint ( 1.00, utils::Color (255, 255, 255, 255)); // snow
  renderer.EnableLight ();
  renderer.SetLightContrast (3.0);
  renderer.SetLightBrightness (2.0);
  renderer.Render ();

  utils::WriterBMP writer;
  writer.SetSourceImage (image);
  writer.SetDestFilename ("tutorial.bmp");
  writer.WriteDestFile ();
There's one problem with this source file: the terrain height map it generates has elevations that range from -1 to +1, while the Terragen writer class assumes that all elevation values are measured in meters. If you don't make any changes to this height map, the resulting Terragen terrain file will be very flat. Therefore, you'll add another scale/bias noise module to scale the output values so that they are measured in meters.
You'll insert the new scale/bias noise module between the terrainSelector and the finalTerrain noise modules as shown in the following diagram:

To insert this new noise module, add the following highlighted code:
  terrainSelector.SetEdgeFalloff (0.125);

  module::ScaleBias terrainScaler;
  terrainScaler.SetSourceModule (0, terrainSelector);

  module::Turbulence finalTerrain;
  finalTerrain.SetSourceModule (0, terrainSelector);
Now it's time to scale the output from the terrainSelector noise module by a factor of 375. This will cause its output to range from (-1 * 375) to (+1 * 375), or in other words, -375 to 375. Add the following highlighted code:
  module::ScaleBias terrainScaler;
  terrainScaler.SetSourceModule (0, terrainSelector);
  terrainScaler.SetScale (375.0);
Next, you'll apply a bias of +375 to the output from the terrainSelector noise module. This will cause its output to range from (-375 + 375) to (+375 + 375), or in other words, 0 to 750. You'll apply this bias so that most of the elevations in the resulting terrain height map are above sea level. Add the following highlighted code:
  module::ScaleBias terrainScaler;
  terrainScaler.SetSourceModule (0, terrainSelector);
  terrainScaler.SetScale (375.0);
  terrainScaler.SetBias (375.0);
In a scale/bias noise module, the scaling factor is always applied before the bias.
At this stage, the output of the terrainSelector noise module will produce a terrain height map with elevations ranging from 0 to 750 meters above sea level.
Now, you'll need to attach the terrainScaler noise module to the finalTerrain noise module. Modify the following highlighted code:
  module::Turbulence finalTerrain;
  finalTerrain.SetSourceModule (0, terrainScaler);
  finalTerrain.SetFrequency (4.0);
  finalTerrain.SetPower (0.125);
The noise modules are now properly combined.
You'll also set the size of the terrain height map to 513 x 513, which is the maximum terrain size that is supported by the freeware version of Terragen. Modify the following highlighted code:
  heightMapBuilder.SetSourceModule (finalTerrain);
  heightMapBuilder.SetDestNoiseMap (heightMap);
  heightMapBuilder.SetDestSize (513, 513);
  heightMapBuilder.SetBounds (6.0, 10.0, 1.0, 5.0);
  heightMapBuilder.Build ();
You'll now add some code that will write the resulting terrain height map to a Terragen terrain file. Add the following highlighted code:
  heightMapBuilder.Build ();

  utils::WriterTER writer;
  writer.SetSourceNoiseMap (heightMap);
  writer.SetDestFilename ("terrain.ter");
  writer.SetMetersPerPoint (15);
  writer.WriteDestFile ();

  return 0;
Note that you're calling the SetMetersPerPoint() method. This method sets the spatial resolution — the distance between adjacent elevation points — of the Terragen terrain file. You've set the spatial resolution to 15 meters, so that the elevation points are 15 meters apart.
You're now ready to create the Terragen terrain file. Compile and run the program. Once it exits, you should see the terrain.ter file in the current directory. In the next section of this tutorial, you'll open this file in Terragen.
Opening and rendering the terrain height map in Terragen
Now it's time to open your terrain height map in Terragen. When this tutorial was written, the current version of Terragen was 0.9.19. This section assumes you have version 0.9.19 installed, but other versions of Terragen should work OK.
First, run the Terragen application. Depending on your operating system and Terragen version, the Terragen main window should look like this:

Terragen has several windows within the main window. The Rendering Control window shows the render preview and also allows you to set the exact camera coordinates. The Landscape window allows you to create a Terragen terrain and create a surface map for it.
Opening the Terragen terrain file
In the Landscape window, look for the Terrain - [New] frame. In that frame, click the Open... button. The Terrain File dialog box appears:

Go to the directory containing your source file and look for the terrain.ter file. Open this file. When you open it, Terragen displays a top-down view of your terrain height map in the Landscape window:

In the top-down view, black represents low elevations and white represents high elevations.
Opening and modifying a surface map file
If you were to now render this terrain height map, the surface of the terrain would be colored in a single shade of gray. That doesn't sound very interesting so you'll add some color to the terrain.
Terragen uses surface maps to specify the properties of the terrain's procedural textures such as color and roughness. Terragen comes with a few surface maps in the default installation. For this tutorial, you'll use the "grass & snow" surface map.
In the Landscape window, look for the Surface Map frame. In that frame, click the Open... button. The Surface Map File dialog appears:

Terragen stores these surface maps in the same directory as the Terragen installation. On a Windows-based PC, the default installation directory is c:\Program Files\Terragen. Go to the directory where Terragen is installed, then select the GrassAndSnow2.srf file and open it. In the Surface Map frame within the Landscape window, you'll see the contents of the opened surface map:

If you examine the surface map, you'll see that it consists of rock, grass, and snow textures. Elements that are lower in the surface map list cover up the higher elements, so in this case, snow covers grass.
If you now render the terrain height map, the terrain will almost be completely covered in snow. Because of this, you'll need to modify this surface map so that the snow only appears at higher elevations.
In the Landscape window, look for the Surface Map frame. In that frame, double-click on the Snow element. This will open the Surface Layer dialog:

The square section on the left side is a preview window that shows the part of the terrain that is covered by the snow layer. As you can see, nearly all the terrain is covered in snow. To reduce the snow cover, you'll need to modify its advanced properties. Click on the Advanced Distribution tab. You'll now see a large number of controls that are used to define the areas of snow on the terrain:

When you examine these controls, you'll note that the snow appears at a minimum altitude of 450 meters below sea level. Since most of the terrain is above sea level, you'll need to modify this value. Change this value to 250 meters above sea level and click elsewhere in this dialog box. When you look in the preview window, you'll note that the snow has largely disappeared and now only appears in the mountains. The surface map is now ready, so close the dialog box.
Positioning the Camera
Now, you'll place the camera. In the Landscape window, click on the top-down view of the terrain height map. This will open the Landscape View/Sclupt window, which contains a much larger view of the height map:

To set up the camera, click the left mouse button at the position you want to place the camera.
The camera looks at a position called a target. To set up the target, click the right mouse button at the position you want to place the target.
When I generated the images at the end of this tutorial, I placed the camera in the valley on the right side and placed the target on the left side.
Rendering the Image
Because Terragen takes forever and a day to render images, you should render a quick preview first. In the Rendering Control window, click on the Render Preview button. Terragen creates a small rendering in the top-left corner of the window:

If you're OK with the preview, it's time to render the real thing. Click on the Render Image button. After several seconds or a few minutes, the rendering should be complete:

Click on the image for a larger version:
You've now made a 3D rendering of your terrain height map! Unfortunately, it's a little blocky. To increase the detail, you'll need to move the Detail slider all the way to the right. Once you do that, render the image again.
It'll be some time before the rendering is finished. Depending on your computer, it should take anywhere from 30 seconds to 20 minutes. Time to get a beer from the fridge. Once it is done, take a look:
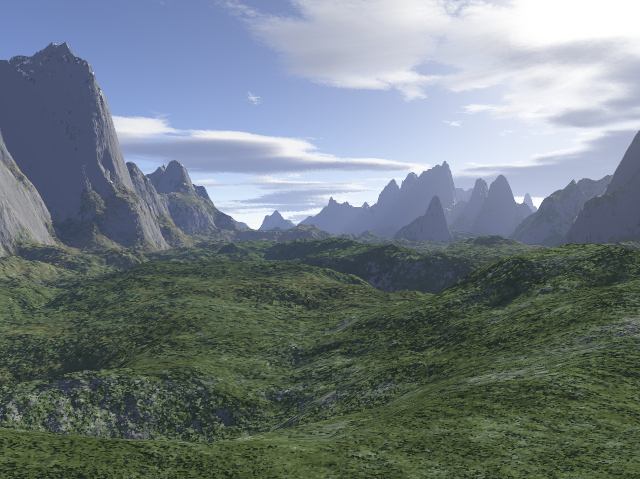
You'll notice some nice details on the ground and cliffs. The clouds also look realistic as well. Not bad for your first rendering.
Conclusion
In this tutorial, you've used the noiseutils library to create a Terragen terrain file from your terrain height map. In Terragen, you've opened a surface map containing grass and snow, modified it so that snow only appears in the mountainous areas, and then made some renderings of the height map.
For some more examples of libnoise-generated terrains rendered with Terragen, take a look at the complex planetary surface example.
Play around with Terragen for awhile and see what kinds of renderings you can create. Load one of the surface maps, or better yet, create your own. If you want to do some more advanced Terragen tutorials, take a look at TerraSource.
© 2003-2005 Jason Bevins
